Making TESSELATE - Part 3
03//preparations
It was almost time for the midterm defense.
Honestly, we were pretty confident with what he had to show. What we focused on throughout the start of the term was polishing a "vertical slice" of our game, which is an almost complete portion of the project. Showing a complete level, with a sample of end-project graphics and some working mechanics. Pouring all of our attention into one level was definitely a great strategy, because we were able to simulate what it was like to work on all parts of a stage. After which, it was just a matter of repeating the process to create the rest of the game.
[Design]
Being a First-Person Puzzle game, we decided that the primary goal of the Player, after boiling away all of the gameplay, is to reach a certain point in the level to "complete" it. Point A to Point B. The "gameplay" would be having the player go through obstacles that are hindering him from doing so.
The theme of TESSELATE is "Discovery". We wanted to the Player to explore, to take their time trying to understand the level, the geometry. The obstacle then for the Player is the overcoming of the unknown. The gameplay is for the Player to -find- Point B, and figure out how to get to it.
[Production]
We were able to break down what we needed to show for midterms into easily manageable chunks. Namely:
1. Introduction
2. Level Layout
3. Obstacles
4. Level End
5. Documentation
6. Presentation
We needed to focus on these because what's most important for the presentation is the actual game itself. I knew that documentation and talking were just icing on the cake, what we definitely did NOT want to do is have a presentation that was ALL icing and NO cake.
Level Layout and Obstacles were already completed. Layout was drawn and Obstacles were almost all completed. We had our Key and Door mechanic, which allowed passage and hindered entry for the Player.
Introduction and Level End were then easily combined into one problem. Which I decided would best be solved by establishing shots. Establishing shots and cutscenes were things that were mentioned by our Thesis Mentor, Sir Abet Ongkingco, in his STORYBD classes. He lamented the fact that game dev students did not properly use cutscenes to set up the story or narrative. Since our game is heavily dependent on the narrative, we decided that this was a perfect opportunity for us to utilize this oft-disregarded tool.
[Programming]
Movement of cameras is pretty straightforward: they have Position and Rotation, which are easily manipulated. It was just a matter of placing all of the cameras into an array and cycle through them when their movement was completed.
I made two scripts, one for the CameraMovement, and one for the CameraHolder.
The CameraMovement script contained a Vector, Speed, and Duration. The Camera would move along the Vector at the given Speed for the Duration.
/*
Some of these codes are pretty interesting broad strokes. If you're already familiar with Unity programming, they're actually really fun to type down and code. It's like doing a kickflip on a skateboard. If you've done hundreds of kickflips, it'll just come naturally. In this case, I've done hundreds of Movement functions based on Speed and Duration. So programming the camera was really nothing new.
This is why I always stress that you get better at programming through experience. Spending your free time throwing together prototypes is definitely a worthwhile endeavor. Especially if you start over again and again. This way you get to redo codes that you've done before, and ingrain in your mind the logic needed to get these basic codes out of the way quickly.
I remember one time in GMPROG class, we were starting a new project and after 5 minutes my friend looked over at my work. I had a bunch of scripts working already, with collision and character input done. He asked me if I memorized the codes, but my answer was that... I didn't memorize the code, I just memorized the logic. For me, gliding through the easy codes was fun and enjoyable. Logic has always been my favorite thing.
*/
The CameraHolder would contain an array of Cameras and cycle through them. When a Camera sends a Message that the movement was completed, the CameraHolder would Deactivate that Camera and Activate the next one.
When the list of Cameras was completed, the CameraHolder would send a message to the LevelManager and tell it to either activate the Player, or if it was the Level Ender Cutscene, transition to the next level.
When the player touches the End Goal of the level, it would trigger another CameraHolder (The one holding the Level Ender Cutscene). Then it'll show the ending shots... destablishing shots(?) and eventually fade to black.
Pretty straightforward code.
[Design]
I placed the Cameras around the level, trying to get good angles and shots. What I wanted to do was show the different parts of the level and some hints as to how the puzzle worked.
I set some of the cameras above the level to give the player a sense of the scale. I made sure to highlight the actual size of the level, even show some interesting features to encourage the Player to explore.
Intro and Ending, done.
If you noticed, some of the level screenshots look different from each other. That's because we were still experimenting with a color scheme all the way until the end. Even our Finals defense had a different color scheme from the way it looked in Midterm Defense and the ESGS booth haha.
[Production]
Since we decided that the level to be presented was Level 4, we didn't bother ourselves with creating a tutorial. A tutorial takes a lot of time to build and would have caused us to shift attention away from the meat of the presentation, which was the gameplay. We had a polished vertical slice, with moving parts and working mechanics. Now all we needed was the document and the actual presentation.
I am a stickler for perfect grammar. I attribute that to my elementary and high school education, where all of our subjects were taught in English (except for Filipino, of course) and it was generally the language used by everybody at school. Speaking in front and even having to perform in plays, our oration and enunciation skills had a primary focus in school. We even learned some Latin, I took up 2 years of it in high school and I really love the language. Studying Latin strengthened our already top-notch English grammar skills.
Anyway, what I'm saying is that I love writing documents.
The thing about Game Design Documents is that there is no right or wrong way to make them, but there's definitely a good balance that could be achieved when writing them.
Some people like making extremely long 60 page documents that get into the nitty-gritty of every mechanic of their game, while others just make simple 1 or 2 page skeleton docus that serve as guidelines for development. I generally like to go somewhere in the middle of that, 8 to 10 pages are usually enough for me to get my point across, especially because GDDs are meant for internal use only.
GDDs that exceed 20 pages are not really necessary, they're pedantic and get way too detailed about things that might not even end up in the final product. What we want to avoid is setting our milestones too specifically, because that leaves us little room to adjust the process and vision. I'd much rather focus on creating a prototype and -showing- rather than -telling-.
I started the document back in August, even before thesis term. I had a general idea of what I wanted the game to be like; it morphed and evolved over time, as we added new ideas, subtracted features. The document covered most of the aspects of the design, although I will get into more detail in another post.
If you want a copy of the Game Design Document, don't hesitate to PM me on Facebook or shoot me an email at vinnylayog@gmail.com, I'll send it to you, no sweat!
Lastly, we needed a presentation.
I wrote a defense script a week before the midterm defense. We wanted to have a smoothly flowing presentation that was packed with substance. No uhhms and no dead air. I gave each group member a section where they got to speak and all we had to do was read from the script.
For our presentation, we opted to use Prezi. Prezi is great for visuals because the transitions are very animated and ~dynamic~, instead of a bland slideshow of some screenshots. We added reference pictures and even some comparison screenshots to show off the concept art. We planned the presentation to follow the script closely, showing off exactly what we were talking about as we moved forward through the script.
Since we were basing our designs and concepts off of a specific genre, which is Vaporwave, we had plenty of opportunity to show off the art that inspired the game. The presentation was timed at 16 minutes straight of talking, giving us plenty of time to present the completed gameplay afterwards.
Actually, the Prezi was a rush job. LOL. Literally crammed a Prezi together 15 minutes before our midterm defense. Don't do that, kids. It's stressful as fudge.
Now that everything was completed, we were more than ready for the midterm defense!!
__________________________________________________
If you've made it this far, I'd like to thank you from the bottom of my heart!! This post got a bit more technical than I intended, but it's a great way for me to show you some of the challenges we faced along the way.
I'm planning to separate some posts to get into more specifics, if you have any suggestions for what my next post can be, please tell me! I already have some ideas, maybe how we experimented with the Camera Effects, or more in-depth discussion on the Design Document.
Otherwise, WE JUST WON GDAP'S GAME OF THE YEAR!!! HOLY COW!!! I am so proud of what Project Theta was able to accomplish. This game is our baby, we worked so hard on it and it's been such an amazing ride from the start.
Winning GOTY is pushing me to continue working on this blog series, so that if in some way it may help or inspire other devs to keep working on their games!
Thank you so much for reading! Til next time!
It was almost time for the midterm defense.
Honestly, we were pretty confident with what he had to show. What we focused on throughout the start of the term was polishing a "vertical slice" of our game, which is an almost complete portion of the project. Showing a complete level, with a sample of end-project graphics and some working mechanics. Pouring all of our attention into one level was definitely a great strategy, because we were able to simulate what it was like to work on all parts of a stage. After which, it was just a matter of repeating the process to create the rest of the game.
[Design]
Being a First-Person Puzzle game, we decided that the primary goal of the Player, after boiling away all of the gameplay, is to reach a certain point in the level to "complete" it. Point A to Point B. The "gameplay" would be having the player go through obstacles that are hindering him from doing so.
The theme of TESSELATE is "Discovery". We wanted to the Player to explore, to take their time trying to understand the level, the geometry. The obstacle then for the Player is the overcoming of the unknown. The gameplay is for the Player to -find- Point B, and figure out how to get to it.
 |
| Objective: Get to this thingy, I guess (??) |
We were able to break down what we needed to show for midterms into easily manageable chunks. Namely:
1. Introduction
2. Level Layout
3. Obstacles
4. Level End
5. Documentation
6. Presentation
We needed to focus on these because what's most important for the presentation is the actual game itself. I knew that documentation and talking were just icing on the cake, what we definitely did NOT want to do is have a presentation that was ALL icing and NO cake.
Level Layout and Obstacles were already completed. Layout was drawn and Obstacles were almost all completed. We had our Key and Door mechanic, which allowed passage and hindered entry for the Player.
 |
| Door meets Key... |
 |
| ... Door falls in love with Key... |
 |
| ...Door has an existential crisis and disappears forever... |
[Programming]
Movement of cameras is pretty straightforward: they have Position and Rotation, which are easily manipulated. It was just a matter of placing all of the cameras into an array and cycle through them when their movement was completed.
I made two scripts, one for the CameraMovement, and one for the CameraHolder.
The CameraMovement script contained a Vector, Speed, and Duration. The Camera would move along the Vector at the given Speed for the Duration.
 |
| Easy as 1, 1, 2, 3! |
Some of these codes are pretty interesting broad strokes. If you're already familiar with Unity programming, they're actually really fun to type down and code. It's like doing a kickflip on a skateboard. If you've done hundreds of kickflips, it'll just come naturally. In this case, I've done hundreds of Movement functions based on Speed and Duration. So programming the camera was really nothing new.
This is why I always stress that you get better at programming through experience. Spending your free time throwing together prototypes is definitely a worthwhile endeavor. Especially if you start over again and again. This way you get to redo codes that you've done before, and ingrain in your mind the logic needed to get these basic codes out of the way quickly.
I remember one time in GMPROG class, we were starting a new project and after 5 minutes my friend looked over at my work. I had a bunch of scripts working already, with collision and character input done. He asked me if I memorized the codes, but my answer was that... I didn't memorize the code, I just memorized the logic. For me, gliding through the easy codes was fun and enjoyable. Logic has always been my favorite thing.
*/
 |
| going through an array of cameras |
 |
| either Spawn the Player or End the Level |
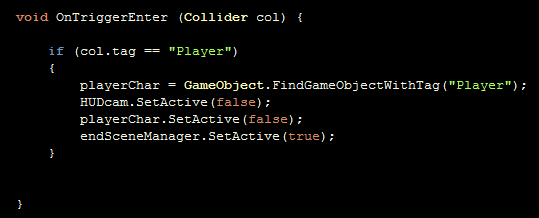 |
| levelEnder |
Pretty straightforward code.
[Design]
I placed the Cameras around the level, trying to get good angles and shots. What I wanted to do was show the different parts of the level and some hints as to how the puzzle worked.
 |
| setting the camera |
 |
| The Hypercube |
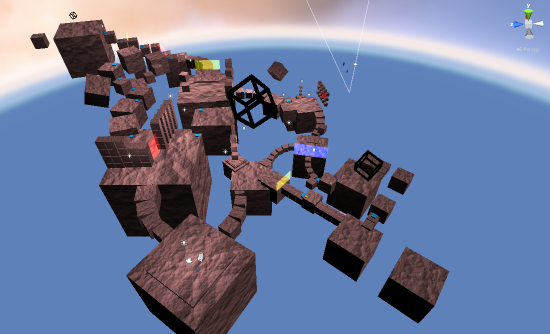 |
| overview of the level layout |
If you noticed, some of the level screenshots look different from each other. That's because we were still experimenting with a color scheme all the way until the end. Even our Finals defense had a different color scheme from the way it looked in Midterm Defense and the ESGS booth haha.
[Production]
Since we decided that the level to be presented was Level 4, we didn't bother ourselves with creating a tutorial. A tutorial takes a lot of time to build and would have caused us to shift attention away from the meat of the presentation, which was the gameplay. We had a polished vertical slice, with moving parts and working mechanics. Now all we needed was the document and the actual presentation.
I am a stickler for perfect grammar. I attribute that to my elementary and high school education, where all of our subjects were taught in English (except for Filipino, of course) and it was generally the language used by everybody at school. Speaking in front and even having to perform in plays, our oration and enunciation skills had a primary focus in school. We even learned some Latin, I took up 2 years of it in high school and I really love the language. Studying Latin strengthened our already top-notch English grammar skills.
Anyway, what I'm saying is that I love writing documents.
 |
| T E S S E L A T E |
Some people like making extremely long 60 page documents that get into the nitty-gritty of every mechanic of their game, while others just make simple 1 or 2 page skeleton docus that serve as guidelines for development. I generally like to go somewhere in the middle of that, 8 to 10 pages are usually enough for me to get my point across, especially because GDDs are meant for internal use only.
GDDs that exceed 20 pages are not really necessary, they're pedantic and get way too detailed about things that might not even end up in the final product. What we want to avoid is setting our milestones too specifically, because that leaves us little room to adjust the process and vision. I'd much rather focus on creating a prototype and -showing- rather than -telling-.
I started the document back in August, even before thesis term. I had a general idea of what I wanted the game to be like; it morphed and evolved over time, as we added new ideas, subtracted features. The document covered most of the aspects of the design, although I will get into more detail in another post.
If you want a copy of the Game Design Document, don't hesitate to PM me on Facebook or shoot me an email at vinnylayog@gmail.com, I'll send it to you, no sweat!
 |
| lol at those design goals |
I wrote a defense script a week before the midterm defense. We wanted to have a smoothly flowing presentation that was packed with substance. No uhhms and no dead air. I gave each group member a section where they got to speak and all we had to do was read from the script.
For our presentation, we opted to use Prezi. Prezi is great for visuals because the transitions are very animated and ~dynamic~, instead of a bland slideshow of some screenshots. We added reference pictures and even some comparison screenshots to show off the concept art. We planned the presentation to follow the script closely, showing off exactly what we were talking about as we moved forward through the script.
 |
| LOL at that subtitle |
Actually, the Prezi was a rush job. LOL. Literally crammed a Prezi together 15 minutes before our midterm defense. Don't do that, kids. It's stressful as fudge.
Now that everything was completed, we were more than ready for the midterm defense!!
__________________________________________________
If you've made it this far, I'd like to thank you from the bottom of my heart!! This post got a bit more technical than I intended, but it's a great way for me to show you some of the challenges we faced along the way.
I'm planning to separate some posts to get into more specifics, if you have any suggestions for what my next post can be, please tell me! I already have some ideas, maybe how we experimented with the Camera Effects, or more in-depth discussion on the Design Document.
Otherwise, WE JUST WON GDAP'S GAME OF THE YEAR!!! HOLY COW!!! I am so proud of what Project Theta was able to accomplish. This game is our baby, we worked so hard on it and it's been such an amazing ride from the start.
Winning GOTY is pushing me to continue working on this blog series, so that if in some way it may help or inspire other devs to keep working on their games!
Thank you so much for reading! Til next time!


Comments
Post a Comment
Got a question for me? Constructive criticism? Leave a note.